Project Management

Project Management is the home page that appears after logging in at-. You can also access it at any time by clicking on your username in the top right corner and then selecting "Project Management." In Project Management, you can create, edit, and delete your projects.
At the top of the page, you’ll see an overview of your plan details and your current usage.

The table shows you:
- how many projects are available to you and how many have already been created
- the number of Whitelabel-licenses (Whitelabel-licenses can be added optionally upon request)
- the available and used Crawler-budget for all projects (total number of URLs that can be crawled)
- the number of CookieManager-requests in the current month (resets on the 1st of each month).
Your Current Plan
The section next to it displays your current plan—in this example, the Starter-plan. You can use the "Go to Plan Overview" button to sign up for a different plan directly from there. Use the "Cancel Plan" button to cancel your existing plan.
Activating Gleit-Plans
With the Gleit-plans, your plan is automatically upgraded if your data allowance is insufficient. Within the Business-plans , you can also be automatically downgraded to a lower tier if your usage drops significantly.
If you are on the Starter-plan and use the Gleit-plan-feature, you will be automatically upgraded to a Business-plan if necessary. However, you will not be downgraded back to the Starter-plan to ensure that no features are lost.
How to activate the Gleit-plan
You can find the activation option in Project Management in the right-hand box labeled "Activate Gleit-plan." Check the box next to "Activate now" and click "Save."
Prerequisites:
- At least one “Starter”-plan must be booked.
- Only available with monthly payment.
- Only available with the following payment methods: credit card, invoice, or direct debit.
Important: As long as the checkbox is not selected, no automatic upgrade will take place. In this case, you will simply receive a notification via e--mail as usual when your quota is about to run out.
How does the Gleit-plan work?
Automatic Upgrade: If 95% of your available quota has been used up at least one day before the end of the month, your account will automatically be upgraded to the next higher plan.
Example: You’re using the Business-plan with 100,000 views per month. On the 27th, you reach 95,000 page views—at which point you’ll automatically be upgraded to the next higher Business-plan with 250,000 page views. The term is again 1 month starting from the new activation date.
Automatic Downgrade: If, in the month following the upgrade, you use no more than 25% of the next lower Business-plan, the more affordable Business-tier will automatically be reactivated.
A downgrade below the lowest Business-tier—that is, to the Starter-plan—will not occur, as this would result in the loss of certain features.
Add New Projects

In the "Add New Projects" section, you have three options available:
-Website (Domain): Adds a new website-domain as a project. -Website (Domain) with Onboarding (recommended option): Adds a new website at-as a project and then guides you through the -onboarding process, which walks you through the setup step by step. -App: Adds a new app at-as a project. Use this option if you want to use CCM19 in a mobile app or an app-environment.
List of All Projects

The list shows all the projects you currently manage. The table displays the following information:
-Type: Whether it is a website or an app. -Project Name: The name or URL of the project. -Views this month: How many CookieManager-views have already been used this month. -Crawler-Budget: The allocated Crawler-budget for this project. -Crawl-Frequency in Days: The interval (in days) at which the project is automatically crawled. -Widget/Domain Active: Indicates whether the widget is active for this project. -White Label: Indicates whether a white label-license is being used for this project. -Theme: Which theme is currently being used for this project. -Edit Banner: Clicking the blue button takes you directly to the project’s banner- and cookie-management. You can find more information here. -Actions: Using the buttons in this column, you can edit, copy, or delete the project, or open the associated page (from left to right).
Use the "Show X Entries" dropdown to adjust the number of projects displayed per page. You can also search for specific projects using the search field in the upper right corner.
Actions
In the "Actions" column, you’ll find four buttons (from left to right):
-Edit entry (green pencil icon): Opens the “Edit Domain” page with all settings for the project (see next section). -Copy Domain (-icon): Creates a copy of the project, including all settings. -Delete Domain (red icon): Completely deletes the project entry after a security prompt. -Visit Domain (-icon): Opens the associated website directly in the browser.
Edit Entry (Edit Domain)
Clicking the green pencil icon takes you to the "Edit Domain" page. Here, you can adjust the following settings for the respective project.
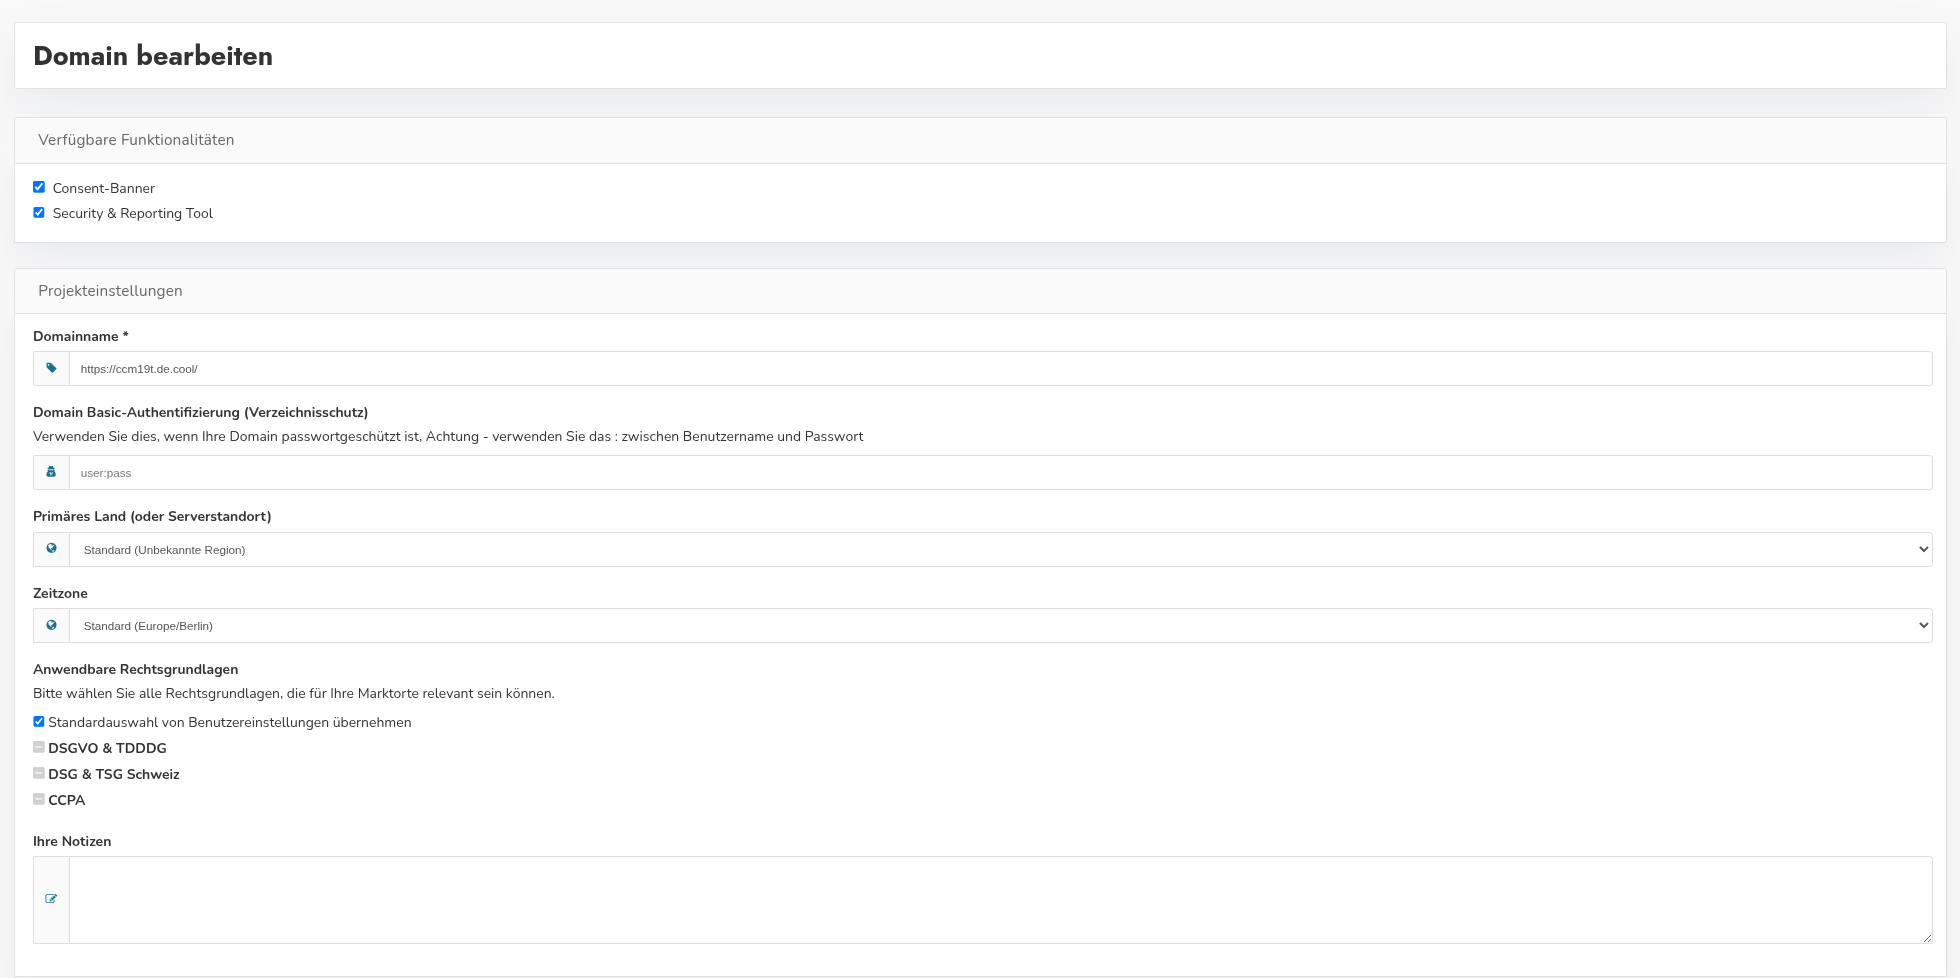
Available Features
Here, you can select which features should be enabled for this project:
-Consent-Banner: Enables the cookie-Consent-banner for the domain. -Security & Reporting Tool: Enables the Security- and Reporting-tool for the domain.
Project Settings
-Domain Name: The URL of the domain for which the project is created.
-Domain Basic-Authentication (Directory Protection): Use this if your domain is password-protected. Otherwise, the crawler will not be able to access the site during onboarding and will not be able to crawl any content. Enter the username and password separated by a colon (e.g., user:pass).
-Primary Country (or Server Location): Select the country or region where your server is located. The default setting is "Default (Unknown Region)."
-Time Zone: Select the time zone for the project. The default setting is "Default (Europe/Berlin)."
-Applicable Legal Bases: Select all legal bases that may be relevant to your markets. You can use the default selection from your user settings or select them individually: GDPR & TDDDG, DSG & TSG Switzerland, CCPA.
-Your Notes: A free-text field where you can enter your own notes about this project.
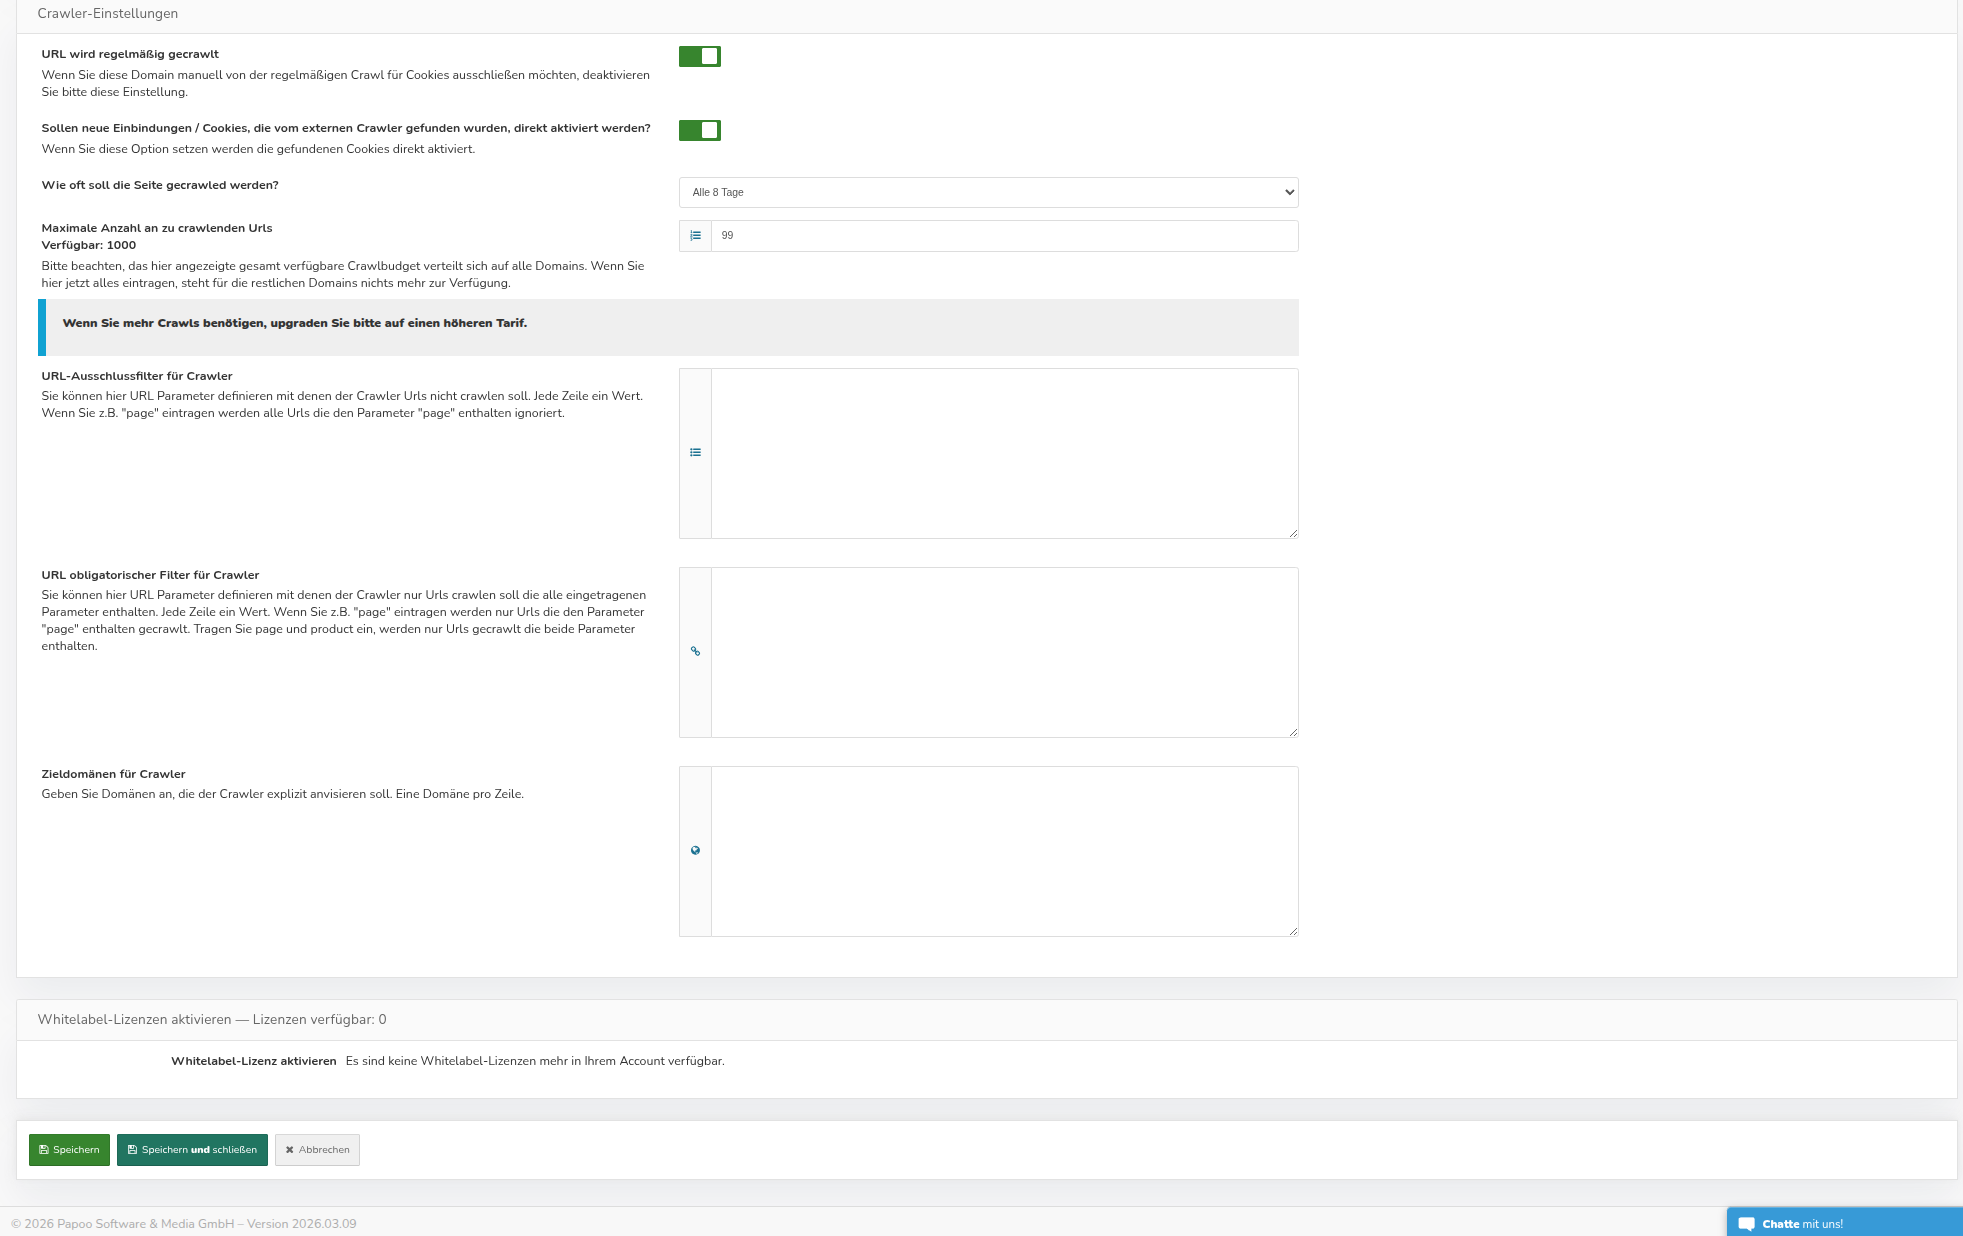
Crawler-Settings
-URL is crawled regularly: If you want to manually exclude this domain from the regular crawl-check for cookies, disable this setting. -Should new integrations / cookies found by the external crawler be activated immediately? If you select this option, the cookies found will be activated immediately. -How often should the page be crawled? Here you can set the crawl-interval (e.g., every 8 days). -Maximum number of URLs to crawl: Specifies the maximum number of URLs the crawler should check for this project. Note that the available crawl budget displayed here is distributed across all domains. If you use up the entire budget here, nothing will be left for the remaining domains.
URL-Exclusion Filters for the Crawler
Here you can define URL-parameters that the crawler should ignore. One value per line. For example, if you enter "page," all URLs containing the string "page" will be ignored.
Mandatory URL Filter for Crawler
Here you can enter strings. Only URLs containing this string will be crawled. One value per line. For example, if you enter “page,” only URLs containing the string “page” will be crawled. If you enter “page” and “product,” only URLs containing both strings will be crawled.
Target Domains for Crawler
Specify domains that the crawler should explicitly target. One domain per line.
Activate Whitelabel-Licenses
In this section, you can activate a Whitelabel-license for the project, provided that licenses are available in your account. You can purchase additional Whitelabel-licenses upon request.
Don’t forget to save your changes using the “Save” or “Save and Close” buttons at the bottom of the page. Clicking “Cancel” will discard all changes.
Bulk Actions

Use these buttons with CAUTION.
-Clear data for all domains in “Permanent Crawler”-: This button deletes all Permanent-Crawler-entries for all domains—in other words, everything the Permanent Crawler has found—WITHOUT CONFIRMATION! The Permanent Crawler regularly checks your domains for new cookies and other entries. After deletion, the data should quickly be replenished. -Delete multiple domains…: This button allows you to delete multiple inactive domains at once. These will then be irretrievably lost. No backup is created at this point! However, a confirmation prompt will appear asking if you really want to delete the domains. -Activate the widget for multiple domains at once: This button lets you activate the widgets for a list of selected domains all at once.