Onboarding durchführen
Onboarding - Step 1
Immediately after your first login to the administration panel, you’ll be guided through the onboarding process. During this process, the most important aspects of your site are queried, scanned, and processed. You can make corrections at any step along the way.
You can adjust and change anything created during onboarding later in the admin panel.
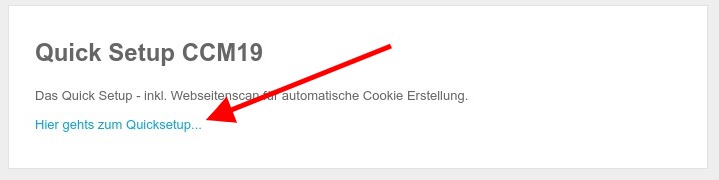
If the onboarding process does not start automatically, you can simply click the following link on the dashboard:
Entering the Domain
After your first login, the following screen will appear: -. Here, you can enter your domain and have it scanned for cookies and scripts. It’s important that you confirm the security notice.
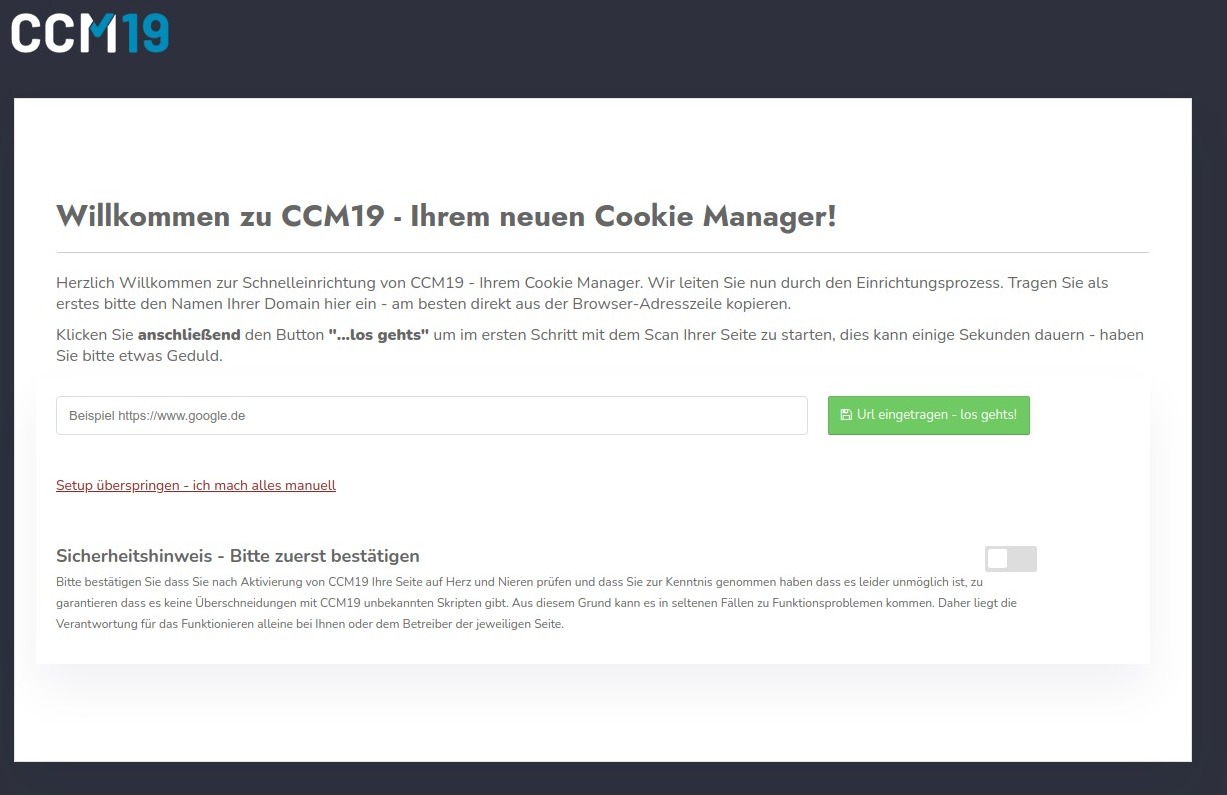
Of course, you can also do everything manually; to do so, simply click the link “Skip setup - I’ll do everything manually.”
Onboarding - Step 2
This step displays the results of the automatic scan of your site. Here, you can import and customize the data. An entry is created for each provider or embedding found.
For each of these entries, the cookies and storage elements used are listed.
Review Scan Results
For each entry, you can add and customize the legally required text here.
Our database runs in the background, automatically assigning the cookies and storage elements that were found.
Additionally, a screenshot of the page is taken so you can verify that the correct page was indeed scanned.
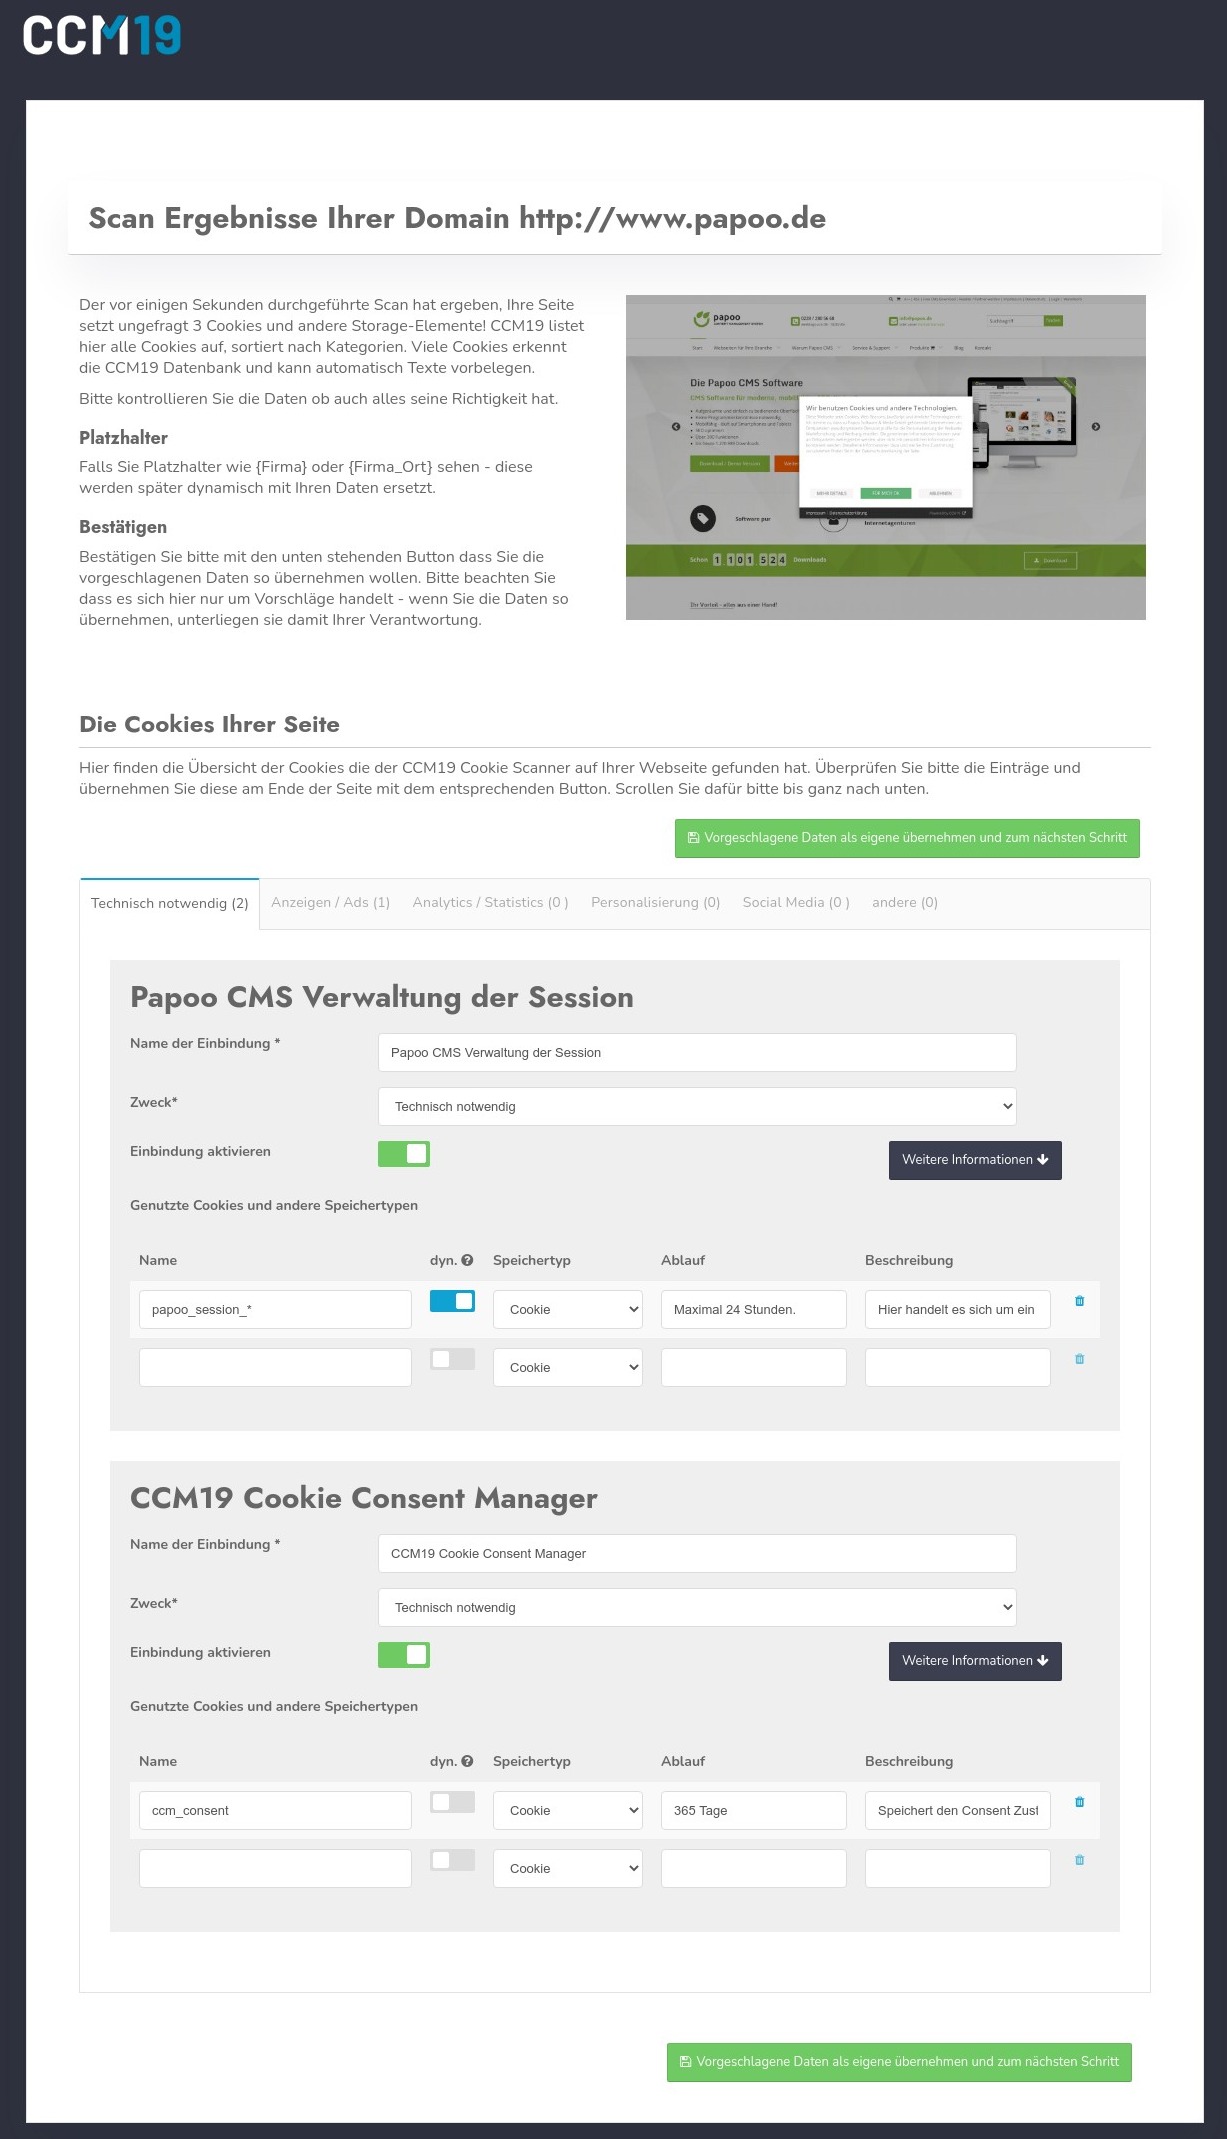
The results are divided into the 5 standard categories to which scripts, cookies, and storage elements are typically assigned.
- Technically Necessary (Essential)
- Ads
- Analytics / Statistics
- Personalization
- Social Media
- Miscellaneous
Next to each entry, you’ll see how many entries were found in the respective category and could be automatically sorted.
Input fields are provided for all information deemed necessary by CCM19.
Name of the Integration
The name of the integration ( - ) can be, for example, Google Analytics or Facebook Pixel. You should use a descriptive name here.
Purpose
The categories mentioned above appear here. You can use them to assign each entry to any category. Please note, however, that you must comply with the legal framework. Facebook Pixel, for example, will likely not be correctly classified under “technically necessary.”
Activate
This activates the entry so that it can also be selected in the frontend.
Automatic Update
If an integration can be assigned to an entry in the database, this option can be enabled. This ensures that when the entry is updated in the CCM19 database, it is automatically updated in your CCM19 as well.
The following items are only visible if you click the “More Information” button.
Block Scripts Containing the Following Text
Here, you can use CCM19 to block scripts embedded in your page’s source code. We’ll show you an example using the Google Analytics-script.
<!-- Global site tag (gtag.js) - Google Analytics -- ><script>
</script><script async src="https://www.googletagmanager.com/gtag/js?id=UA-123456789-1"></script><script>
window.dataLayer = window.dataLayer || [];
function gtag(){dataLayer.push(arguments);}
gtag('js', new Date());
gtag('config', 'UA-123456789-2');
</script>```
Then enter, for example, "googletagmanager.com" in the field -. This will block any JavaScript on your page that contains this string, and the script will not run until consent has been given.
This way, you don’t necessarily have to redesign your site.
### Block iframes that contain the following text
Just as with the scripts in the previous section, you can also block iframes that contain a specific string.\
For example, you could enter "youtube" here. This will block all iframes containing this string as long as consent has not been given.
### Embedding Source Code
Paste the source code of the snippet here. If you haven’t already embedded it on your website, you can do so here via CCM19. (We recommend embedding it via CCM19)
### Cookie Provider
The provider - —enter the company name of the provider offering the script here. In our case, it would be Google Ireland Limited. Feel free to enter the company’s full address here as well.
### Description of the cookie
In the description field, enter the purpose of the integration. Why is this cookie set? What does this integration do?
### Privacy Policy-Link for the Cookie
This is where you should enter the link to the provider’s privacy policy. You can usually find this by visiting the provider’s website.
### What data is collected?
Exactly what data is collected? Just the IP address? Or also click data, browser data, logins, user behavior, and more? Check with the script provider for precise details and describe as accurately as possible what happens to the data. This is the only way to ensure your visitors give informed consent.
### For what purpose is the data collected?
Why are you collecting this data? What do you intend to do with it? Conversion optimization? Improving the user experience? Or simply implementing a shopping cart feature?
### Legal Basis
Here, you define the legal basis on which you intend to implement this integration. For tracking scripts, generally only “Consent, Art. 6(1)(a) GDPR” applies - —the visitor’s consent through an informed decision. In other words, it is purely voluntary.
### Location of Processing
Where is the data processed? This applies not only to your office address but also to the location of the server. Please also note that you are currently not permitted to transfer data to non-safe third countries. Providers that export data to the U.S. are currently likely not legally permissible (as of September 29, 2020).
### List of Cookies and Storage Elements
All cookies and storage elements set by the script are listed here. You can manually add additional elements later via the administrative interface, as the automatic scan cannot always find all data. For example, the scanner cannot find data if it requires the user to be logged in.
### Name
The name displayed in the browser ( - ), e.g., \_ga for a Google Analytics cookie
### dyn.
Use this to specify whether it is a dynamic variable ( - ). For example, using \_g\* blocks all cookies that start with \_g, such as \_ga, \_gid, etc.
### Storage Type
How is the data stored in your browser? (Cookie, Local Storage, Session Storage, IndexedDB, Web SQL, Other)
### Lifetime / Expires
When does the storage entry automatically expire?
### Description
If cookies have different meanings, enter them here. In most cases, however, it is sufficient to simply copy the description that was already entered above.
### Import Data
Once you have reviewed all the data and made any necessary adjustments, click the button below the form to import the data into the CCM19 Administration - (see screenshot).
.jpg>)
<br>
## Onboarding - Step 3
In Step 3, enter the links to your legal notice and privacy policy. You can change this information at any time later in the admin panel.
Since the system recognizes the site and scanned it in the previous step, links to the legal notice and privacy policy are usually automatically entered into the fields, as shown in the next screenshot.
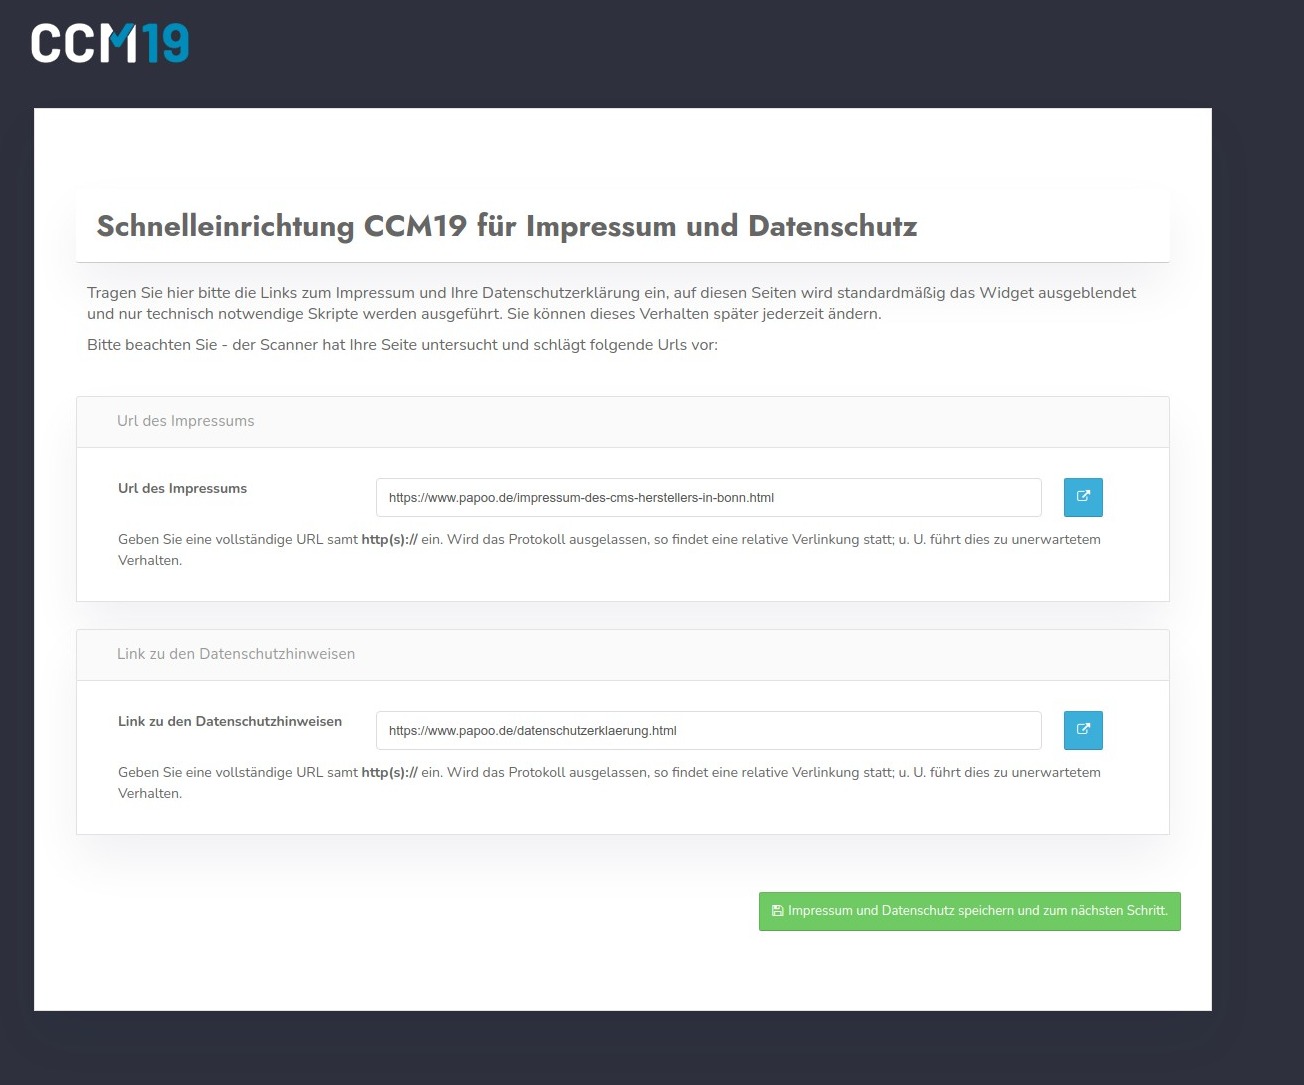
Please adjust the information if necessary so that the correct links are included. Then click the green button to proceed to the next step.
<br>
## Onboarding - Step 4
Here you define the placeholder text for your page -. The most important ones are listed below, as shown in the screenshot:
-**{COMPANY}**- > Enter your company name here.
-**{Company\_PrivacyPolicy}**- > Enter the link to your privacy policy here.
-**{Company\_Location}**- > Enter your company’s registered address here, including the ZIP code and city.
Once you have entered the information, click the green button below.
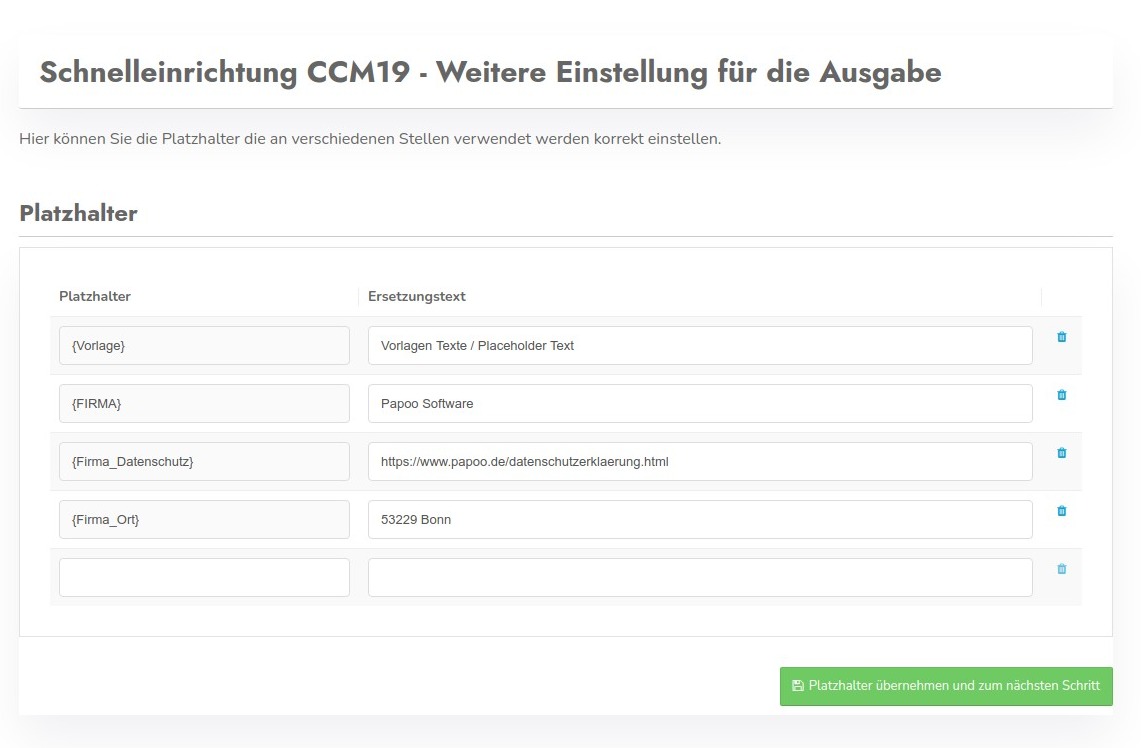
Of course, you can add more placeholders at any time. To do so, simply enter the new placeholder in the bottom field. If the last field is filled in, a new field will automatically appear below it.
<br>
## Onboarding - Step 5
On the last page of the onboarding process, you’ll find the CCM19 embed code for your website. You don’t need to memorize it here - —it’s always displayed exactly the same way in the administration dashboard. However, you can, of course, copy it directly and embed it into your page.
.png)
By default, 3 codes are generated: automatic language selection, German, and English.
You can generate additional codes for other languages by enabling the corresponding language in the admin interface. → [Translations / Texts - CCM19 Cookie Consent Manager Documentation](/functions/translations/)
## Embedding Code
The embedding code might look like this, for example.
<!-- code wrap=true -- >
```javascript<script src="https://cloud.ccm19.de/app.js?apiKey=**********************&domain=*****************" referrerpolicy="origin"></script>```
## Example Integration
Copy this code and embed it on your page as high up in the header as possible, preferably immediately after the first element
```
Done
When you’re finished, click the blue button to return to the CCM19 administration interface.